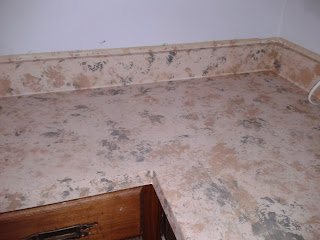
I started the job with more of brown color in mind. My husband thought I was doing the finish that was more black. So I had to put more layers on to achieve a finish more like he wanted. I recommend looking at samples of counters at the home improvement store. After painting the base coat, I suggest working in a small section until you get the look you desire. It is a lot easier to start over with a small section than the whole counter.
 I cleaned the counters with hot soapy water. I sprayed them with a grease cutting kitchen spray and wiped them down. I repeated this step several times. Finally, I used a paint prep spray. This required gloves, goggles, and an apron. Use wide paint masking tape around the edges. I did not because I planned to paint the walls when finished. I used Press’n Seal to cover the paint tray. Foam plates worked well for the “sponging” stages, especially the blended colors. I stored the rollers and sponge brushes in a zipper bag in the freezer because there were several days between the first section of counter and the next.
The first layer was a primer. Then, I mixed the primer with a tan paint for two layers.
I used acrylic paints for the layered colors.
“Sponging” comes next. Make sure you overlap colors, go over the edges in some places, and go all of the way to the edge. I used wadded up plastic bags for the first few layers. I used medium grey followed by medium tan.
This is when my husband came home and asked when I was putting all of the black on it. So I started looking at another sample. Pale lavender grey came next. I used cheap paint brushes (like the ones in children's water colors) to pounce light grey, dark grey, light cream, and light pinkish grey.
I used several sea sponges in the next layers to get different textures. Turn your hand between pounces. This will provide more variety. I started mixing the dark grey and black. I used different shades for several layers. I used straight black for the last sea sponge layer.
I used three layers of Polycryclic. Don’t make the same mistake I did. A foam brush is okay but a foam roller puts bubbles in the finish. It made a neat texture but I would have preferred the smoother finish I got in the small places where I used a foam brush. I waited three days to put items back on the counters.


